 Flutter - 基础布局
# 一、单子布局 Widget
单子布局, 顾名思义就是只能包含一个子控件的 widget
# 1、Align(Center)
Center 可以将子控件居中显示, 默认会尽可能拉伸填满父控件:
class CenterDemo extends StatelessWidget {
Widget build(BuildContext context) {
return Center(
child: Icon(Icons.pets),
);
}
}
通过查看 Center 的源码可以得知, Center 本质上就是无法指定 alignment 的 Align:
class Center extends Align {
  /// Creates a widget that centers its child.
  const Center({ Key? key, double? widthFactor, double? heightFactor, Widget? child })
    : super(key: key, widthFactor: widthFactor, heightFactor: heightFactor, child: child);
}
class Align extends SingleChildRenderObjectWidget {
  /// Creates an alignment widget.
  ///
  /// The alignment defaults to [Alignment.center].
  const Align({
    Key? key,
    this.alignment = Alignment.center,
    this.widthFactor,
    this.heightFactor,
    Widget? child,
  }) : assert(alignment != null),
       assert(widthFactor == null || widthFactor >= 0.0),
       assert(heightFactor == null || heightFactor >= 0.0),
       super(key: key, child: child);
因此, 完全可以使用 Align 来代替 Center:
- widthFactor: 指定 Align 的宽度是子控件宽度的几倍
- heightFactor: 指定 Align 的高度是子控件高度的几倍
- alignment :
- Alignment.bottomCenter : 底部居中
- Alignment.center : 居中
- Alignment(x, y) : 左上角是(-1, -1),右下角是(1, 1)
class AlignDemo extends StatelessWidget {
Widget build(BuildContext context) {
// Center其实就是指定了alignment为center的Align
// return Center(
// child: Icon(Icons.pets),
// );
return Align(
widthFactor: 5, // 宽度是child宽度的5倍
heightFactor: 5, // 高度是child高度的5倍
alignment: Alignment.center,
child: Icon(Icons.pets),
);
}
}
一般情况下, 会直接在外层嵌套
Container直接指定确切的宽度值, 而不会使用widthFactor
# 2、Padding
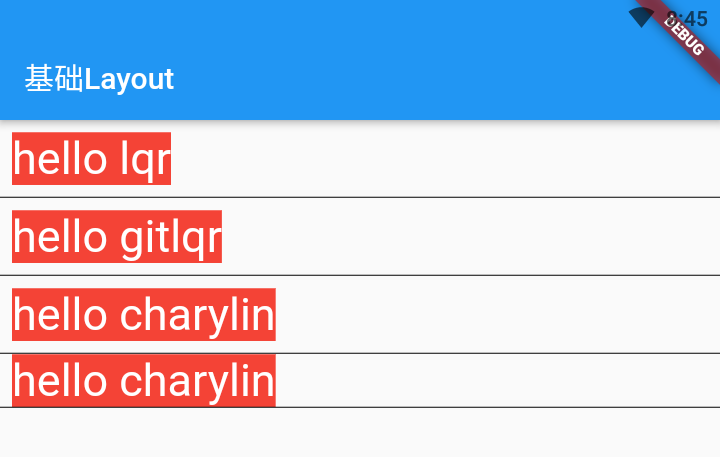
一般的 Widget 是没有 padding 属性的(Container 除外), 如果希望对子 widget 有 padding 效果的话, 可以为子 widget 套一层 Padding, Padding 只有 2 个属性, 分别是 child 和 padding, padding 属性对应 EdgeInsetsGeometry 类型的对象, 一般会结合 EdgeInsets 的几个常量命名构造函数来使用:
- padding: 内间距
- EdgeInsets.all(8.0): 统一指定内间距
- EdgeInsets.symmetric(horizontal: 8, vertical: 8): 纵向、横向分开指定内间距
- EdgeInsets.fromLTRB(8, 8, 8, 8): 上下左右分开指定内间距
- EdgeInsets.only(left: 8): 只指定一个方向内间距
class PaddingDemo extends StatelessWidget {
Widget build(BuildContext context) {
return Column(
crossAxisAlignment: CrossAxisAlignment.start,
children: [
Padding(
padding: EdgeInsets.all(8.0),
child: item("hello lqr"),
),
Divider(height: 1, color: Colors.black),
Padding(
padding: EdgeInsets.symmetric(horizontal: 8, vertical: 8),
child: item("hello gitlqr"),
),
Divider(height: 1, color: Colors.black),
Padding(
padding: EdgeInsets.fromLTRB(8, 8, 8, 8),
child: item("hello charylin"),
),
Divider(height: 1, color: Colors.black),
Padding(
padding: EdgeInsets.only(left: 8),
child: item("hello charylin"),
),
Divider(height: 1, color: Colors.black),
],
);
}
Widget item(String content) {
return Text(
content,
style: TextStyle(
fontSize: 30,
backgroundColor: Colors.red,
color: Colors.white,
),
);
}
}
# 3、Container
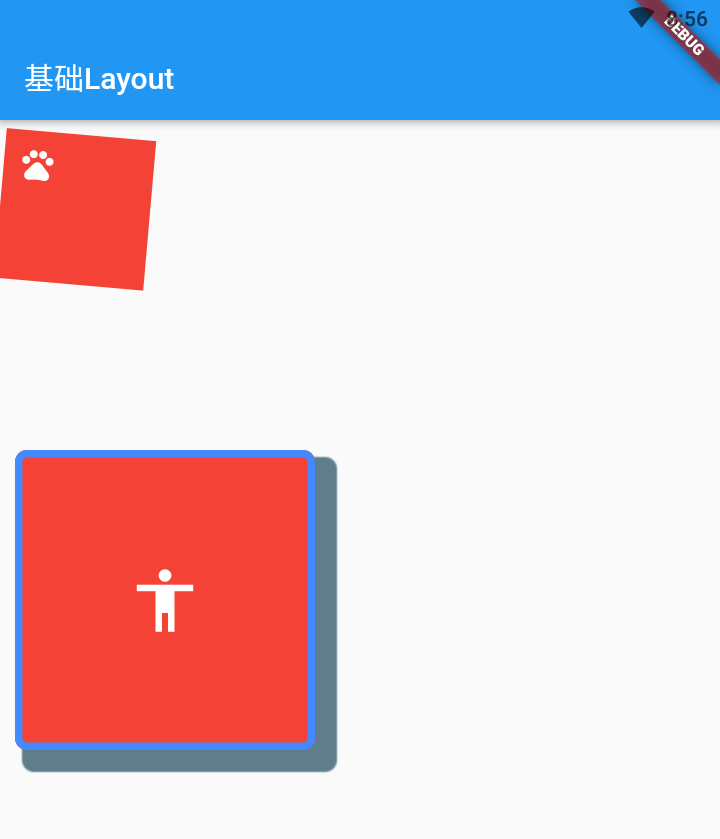
Container 是 Flutter 中最特殊的 widget, 可以指定尺寸、内外间距、2D 转换等:
- width: 宽度
- height: 高度
- alignment: 子 widget 对齐方式
- padding: 内间距, EdgeInsetsGeometry 类型, 一般使用子类 EdgeInsets
- margin: 外间距, EdgeInsetsGeometry 类型, 一般使用子类 EdgeInsets
- transform: 2D 转换, Matrix4 类型
- color: 背景色(注意:与 decoration 中的 color 冲突,只能选择一个设置)
- decoration:BoxDecoration()
- color: 背景色
- border: 边框样式, BoxBorder 类型, 常用
Border.all(width: 5)来指定 - borderRadius: 边框圆角, BorderRadiusGeometry 类型, 常用
BorderRadius.circular(8)来指定 - boxShadow:BoxShadow()
- color: 阴影颜色
- offset: 阴影偏移量
- spreadRadius: 延伸,在 offset 的基础上对 x,y 分别增加
class ContainerDemo extends StatelessWidget {
Widget build(BuildContext context) {
return Column(
children: [
Container(
// width、height不指定,默认是包裹内容
width: 200,
height: 200,
child: Icon(Icons.pets, size: 50, color: Colors.white),
// 子元素所在位置
alignment: Alignment.topLeft,
padding: EdgeInsets.all(20),
margin: EdgeInsets.all(10),
// 旋转5度,缩小一半
transform: Matrix4.rotationZ(degree2Radia(5)).scaled(0.5),
color: Colors.red,
),
Container(
width: 200,
height: 200,
child: Icon(Icons.accessibility, size: 50, color: Colors.white),
// color与decoration冲突,两者只有选择其中一个
// color: Colors.red,
decoration: BoxDecoration(
color: Colors.red, // 背景色
border: Border.all(width: 5, color: Colors.blueAccent), // 边框
borderRadius: BorderRadius.circular(8), // 圆角
boxShadow: [
BoxShadow(
color: Colors.blueGrey, // 阴影颜色
offset: Offset(10, 10), // 阴影偏移量
spreadRadius: 5, // 延伸,相当于offset为 15,15
),
]),
)
],
);
}
double degree2Radia(double degree) {
return degree * pi / 180;
}
}
# 二、多子布局 Widget
多子布局, 顾名思义就是只能包含多个子控件的 widget
# 1、Flex
Flutter 中的 Flex 与 css 中的 flex 布局很类似, 可以很灵活的控制内部子 widget 的摆放, 不过一般情况下不会直接使用, 而是使用其子类 Row / Column:
- Row/Column 继承自 Flex
- Row = Flex(direction: Axis.horizontal)
- mainAxis(主轴): 水平向右
- crossAxis(交叉轴): 竖直向下
- Column = Flex(direction: Axis.vertical)
- mainAxis(主轴): 竖直向下
- crossAxis(交叉轴): 水平向右
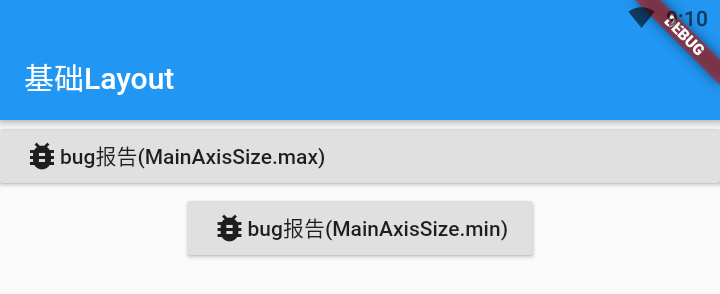
默认情况下, Row 在水平方向上会尽可能占据比较大的空间, 这是因为其 mainAxisSize 属性默认为 MainAxisSize.max 导致:
Column 与 Row 除了方向不同, 其它基本一致, 故掌握 Row 的情况后, Column 自然也会掌握
class ButtonRowDemo extends StatelessWidget {
Widget build(BuildContext context) {
/// Row特点:
/// - 水平方向尽可能占据比较大的空间
/// * 如果水平方向希望包裹内容,可以设置 mainAxisSize = min
/// - 垂直方向包裹内容
return Column(
children: [
RaisedButton(
child: Row(
children: [Icon(Icons.bug_report), Text("bug报告(MainAxisSize.max)")],
),
onPressed: () {},
),
RaisedButton(
child: Row(
mainAxisSize: MainAxisSize.min, // 包裹内容。包裹是max占满父widget
children: [Icon(Icons.bug_report), Text("bug报告(MainAxisSize.min)")],
),
onPressed: () {},
),
],
);
}
}
# 2、Row
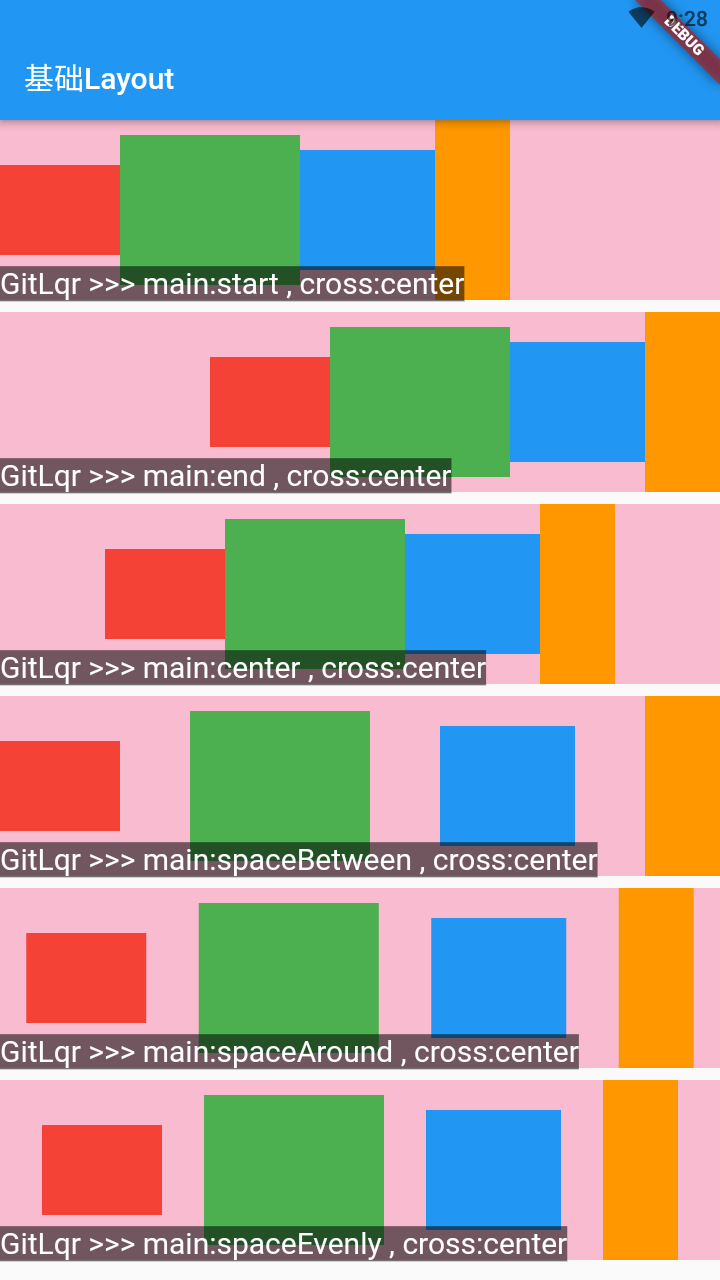
Row 比较重点的是主轴及交叉轴的对齐:
- MainAxisAlignment:
- start: 主轴的开始位置挨个摆放元素
- end: 主轴的结束位置挨个摆放元素
- center: 主轴的中心点对齐
- spaceBetween: 左右两边的间距为 0,其它元素之间平分间距
- spaceAround: 左右两边的间距是其它元素之间的间距的一半
- spaceEvenly: 所有的间距平分空间
- CrossAxisAlignment:
- start: 交叉轴的起始位置对齐
- end: 交叉轴的结束位置对齐
- center: 中心点对齐(默认值)
- baseline: 基线对齐(必须有文本的时候才起效果)
- 使用 baseline 对齐必须指定 textBaseline, 否则会报错.
- stretch: 先让 Row 占据交叉轴尽可能大的空间, 将所有子 widget 交叉轴的高度, 拉伸到最大
class RowDemo1 extends StatelessWidget {
Widget build(BuildContext context) {
return Column(
children: [
itemRow("start", MainAxisAlignment.start, "center", CrossAxisAlignment.center),
itemRow("end", MainAxisAlignment.end, "center", CrossAxisAlignment.center),
itemRow("center", MainAxisAlignment.center, "center", CrossAxisAlignment.center),
itemRow("spaceBetween", MainAxisAlignment.spaceBetween, "center", CrossAxisAlignment.center),
itemRow("spaceAround", MainAxisAlignment.spaceAround, "center", CrossAxisAlignment.center),
itemRow("spaceEvenly", MainAxisAlignment.spaceEvenly, "center", CrossAxisAlignment.center),
],
);
}
Widget itemRow(
String mainAxisAlignmentStr,
MainAxisAlignment mainAxisAlignment,
String crossAxisAlignmentStr,
CrossAxisAlignment crossAxisAlignment) {
return Container(
height: 120,
margin: const EdgeInsets.only(bottom: 8.0),
color: Colors.pink[100],
child: Stack(
fit: StackFit.expand,
children: [
Row(
mainAxisAlignment: mainAxisAlignment,
crossAxisAlignment: crossAxisAlignment,
// textDirection: TextDirection.ltr, // rtl: 从右到左排版; ltr: 从左到右排版(默认)
children: [
Container(width: 80, height: 60, color: Colors.red),
Container(width: 120, height: 100, color: Colors.green),
Container(width: 90, height: 80, color: Colors.blue),
Container(width: 50, height: 120, color: Colors.orange),
],
),
Positioned(
left: 0,
bottom: 0,
child: Text(
"GitLqr >>> main:$mainAxisAlignmentStr , cross:$crossAxisAlignmentStr",
style: TextStyle(fontSize: 20, backgroundColor: Colors.black54, color: Colors.white),
),
)
],
),
);
}
}
class RowDemo2 extends StatelessWidget {
Widget build(BuildContext context) {
// 基线对齐
return Column(
children: [
itemRow("spaceEvenly", MainAxisAlignment.spaceEvenly, "start", CrossAxisAlignment.start),
itemRow("spaceEvenly", MainAxisAlignment.spaceEvenly, "center", CrossAxisAlignment.center),
itemRow("spaceEvenly", MainAxisAlignment.spaceEvenly, "end", CrossAxisAlignment.end),
itemRow("spaceEvenly", MainAxisAlignment.spaceEvenly, "stretch", CrossAxisAlignment.stretch),
Row(
mainAxisAlignment: MainAxisAlignment.spaceEvenly,
crossAxisAlignment: CrossAxisAlignment.baseline,
// alphabetic 与 ideographic 这2种基线几乎没差
textBaseline: TextBaseline.ideographic,
children: [
Container(width: 80,height: 60, color: Colors.red, child: Text("Hellxo", style: TextStyle(fontSize: 20))),
Container(width: 120, height: 100, color: Colors.green, child: Text("Woxrld", style: TextStyle(fontSize: 30)),),
Container(width: 90, height: 80, color: Colors.blue, child: Text("abxc", style: TextStyle(fontSize: 12))),
Container(width: 50, height: 120, color: Colors.orange, child: Text("cxba", style: TextStyle(fontSize: 40))),
],
),
],
);
}
Widget itemRow(
String mainAxisAlignmentStr,
MainAxisAlignment mainAxisAlignment,
String crossAxisAlignmentStr,
CrossAxisAlignment crossAxisAlignment) {
return Container(
height: 140,
margin: const EdgeInsets.only(bottom: 8.0),
color: Colors.pink[100],
child: Stack(
fit: StackFit.expand,
children: [
Row(
mainAxisAlignment: mainAxisAlignment,
crossAxisAlignment: crossAxisAlignment,
// textDirection: TextDirection.ltr, // rtl: 从右到左排版; ltr: 从左到右排版(默认)
children: [
Container(width: 80, height: 60, color: Colors.red),
Container(width: 120, height: 100, color: Colors.green),
Container(width: 90, height: 80, color: Colors.blue),
Container(width: 50, height: 120, color: Colors.orange),
],
),
Positioned(
left: 0,
bottom: 0,
child: Text(
"GitLqr >>> main:$mainAxisAlignmentStr , cross:$crossAxisAlignmentStr",
style: TextStyle(fontSize: 20, backgroundColor: Colors.black54, color: Colors.white),
),
)
],
),
);
}
}
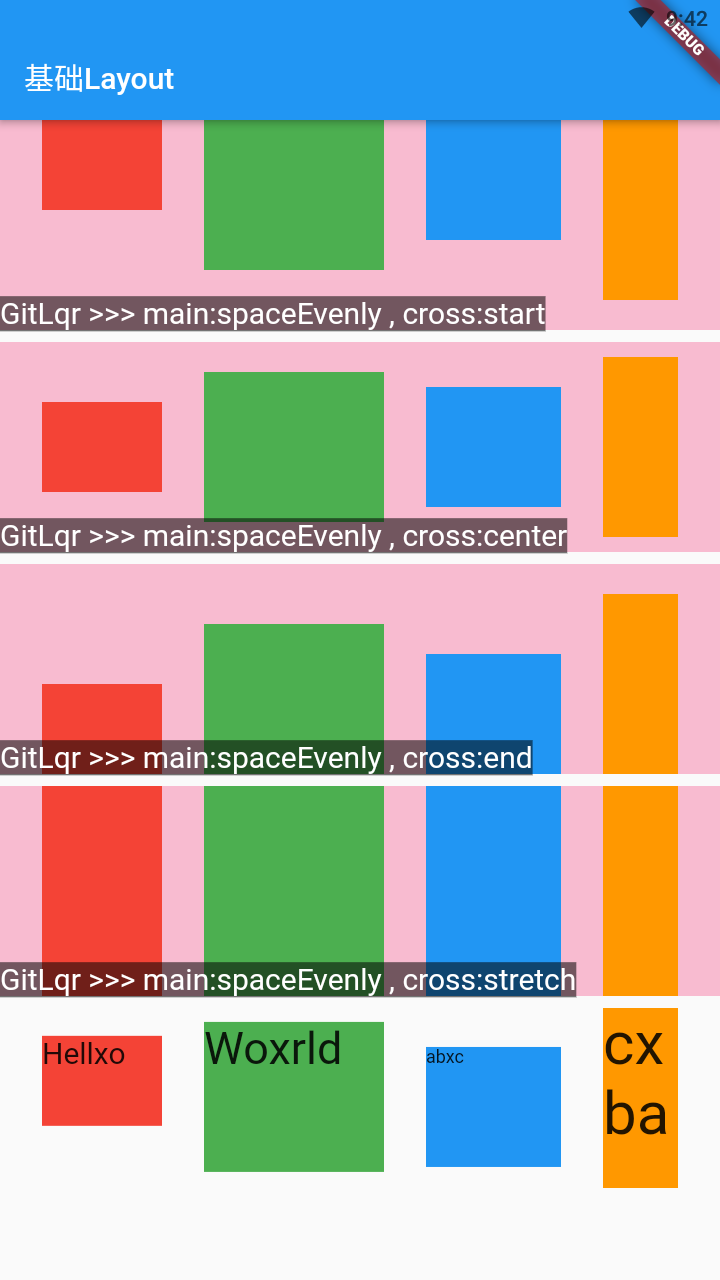
最后一组是
CrossAxisAlignment.baseline的效果, 可以看到不管文字多大, 字母x的底部都是在一条线上的, 这就是基线对齐.
值得注意的是, 使用CrossAxisAlignment.baseline必须同时指定基线textBaseline(默认值为null), 其值TextBaseline.ideographic与TextBaseline.alphabetic几乎没差
# 3、Column
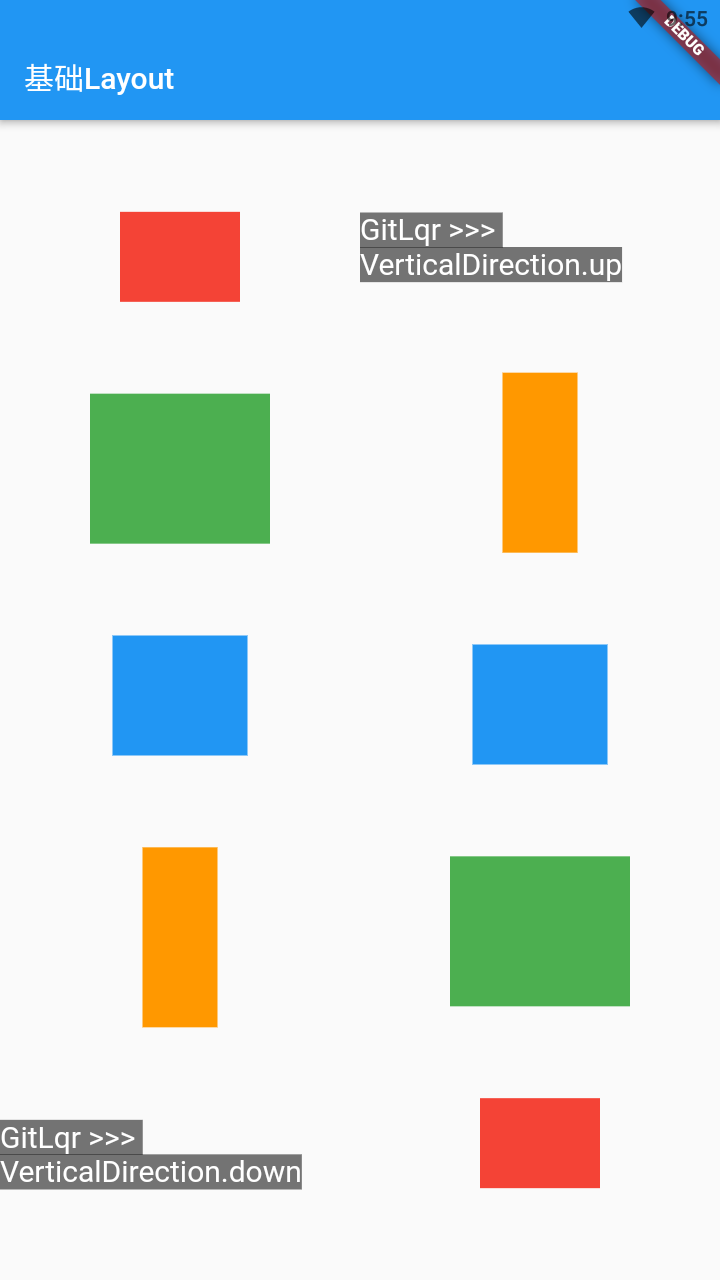
Column 与 Row 都是继承自 Flex, 两者除了在方向上有区别外, 其他特性几乎完全一样, 这里只补充一点它们排版方向上的不同之处:
- Row: 排版方向 TextDirection
- rtl: 从右到左排版
- ltr: 从左到右排版(默认)
- Column: 排版方向 VerticalDirection
- up: 从下到上排版
- down: 从上到下排版(默认)
class ColumnDemo extends StatelessWidget {
Widget build(BuildContext context) {
return Row(children: [
Expanded(
child: Column(
mainAxisAlignment: MainAxisAlignment.spaceEvenly,
crossAxisAlignment: CrossAxisAlignment.center,
verticalDirection: VerticalDirection.down,
// up: 从下到上排版; down: 从上到下排版(默认)
children: [
Container(width: 80, height: 60, color: Colors.red),
Container(width: 120, height: 100, color: Colors.green),
Container(width: 90, height: 80, color: Colors.blue),
Container(width: 50, height: 120, color: Colors.orange),
Text(
"GitLqr >>> VerticalDirection.down",
style: TextStyle(fontSize: 20, backgroundColor: Colors.black54, color: Colors.white),
),
],
),
),
Expanded(
child: Column(
mainAxisAlignment: MainAxisAlignment.spaceEvenly,
crossAxisAlignment: CrossAxisAlignment.center,
verticalDirection: VerticalDirection.up,
// up: 从下到上排版; down: 从上到下排版(默认)
children: [
Container(width: 80, height: 60, color: Colors.red),
Container(width: 120, height: 100, color: Colors.green),
Container(width: 90, height: 80, color: Colors.blue),
Container(width: 50, height: 120, color: Colors.orange),
Text(
"GitLqr >>> VerticalDirection.up",
style: TextStyle(fontSize: 20, backgroundColor: Colors.black54, color: Colors.white),
),
],
),
),
]);
}
}
# 4、Flexible(Expanded)
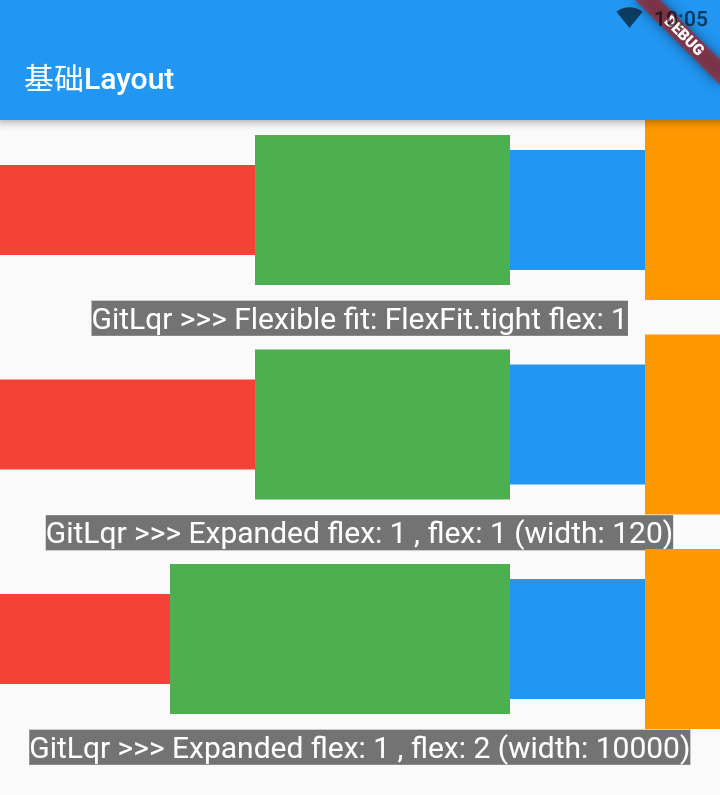
Flexible 中的属性:
- fit: 填充模式
- tight: 子控件强制填满可用空间
- loose: 子控件只占用本身大小
- flex: 当 fit 为 tight 时才会生效 (重点: width 比 = flex 比)
- 不指定 flex 时: 按等分的方式来拉伸 Flexible 直至填满可用空间, 相当于 flex 都是 1
- 有指定 flex 时: 按 flex 的比例来拉伸 Flexible 直至填满可用空间, 此时原本的 width 已经无效了
- fit: 填充模式
Expanded = Flexible(fit: FlexFit.tight)
- 当 Flex(Row/Column)还有可用空间时, 拉伸子控件大小
- 当子控件超出 Flex(Row/Column)空间时, 缩小子控件大小
class ExpandedDemo extends StatelessWidget {
Widget build(BuildContext context) {
return Column(
children: [
item1(),
tip("Flexible fit: FlexFit.tight flex: 1"),
item2(),
tip("Expanded flex: 1 , flex: 1 (width: 120)"),
item3(),
tip("Expanded flex: 1 , flex: 2 (width: 10000)"),
],
);
}
Widget item1() {
return Row(
children: [
Flexible(
fit: FlexFit.tight,
flex: 1,
child: Container(width: 80, height: 60, color: Colors.red),
),
Flexible(
fit: FlexFit.tight,
flex: 1,
child: Container(width: 120, height: 100, color: Colors.green),
),
Container(width: 90, height: 80, color: Colors.blue),
Container(width: 50, height: 120, color: Colors.orange),
],
);
}
Widget item2() {
return Row(
children: [
Expanded(
flex: 1,
child: Container(width: 80, height: 60, color: Colors.red),
),
Expanded(
flex: 1,
child: Container(width: 120, height: 100, color: Colors.green),
),
Container(width: 90, height: 80, color: Colors.blue),
Container(width: 50, height: 120, color: Colors.orange),
],
);
}
Widget item3() {
return Row(
children: [
Expanded(
flex: 1,
child: Container(width: 80, height: 60, color: Colors.red),
),
Expanded(
flex: 2,
child: Container(width: 10000, height: 100, color: Colors.green),
),
Container(width: 90, height: 80, color: Colors.blue),
Container(width: 50, height: 120, color: Colors.orange),
],
);
}
Widget tip(String content) {
return Text(
"GitLqr >>> $content",
style: TextStyle(
fontSize: 20,
color: Colors.white,
backgroundColor: Colors.black54,
),
);
}
}
# 5、Stack
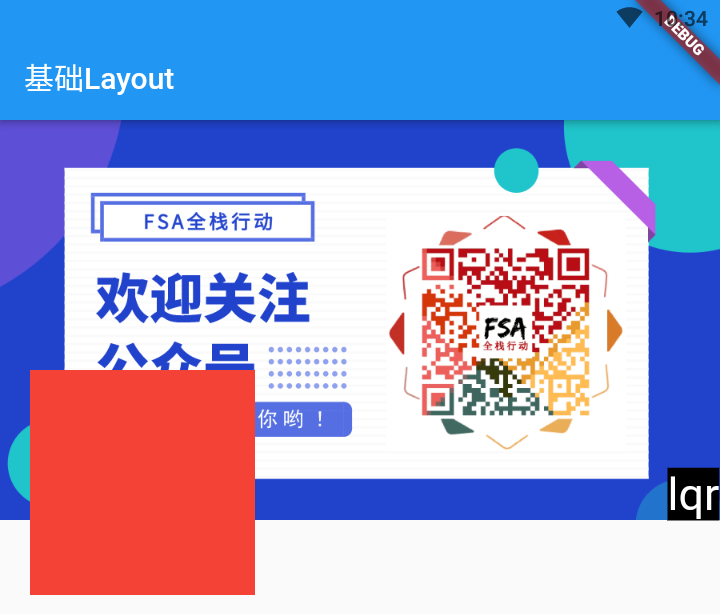
Stack 可以让子 Widget 堆叠在一起, 默认的大小是包裹内容的, 其属性有:
- alignment: 指定从什么位置开始摆放
所有的子 WidgetPositioned(Widget): 对单个子 Widget进行定位
- fit: expand(很少用) 将子元素拉伸到尽可能大
- overflow: 超出部分如何处理, 比如: 超出仍显示的话, 可以使用
Overflow.visible
class StackDemo1 extends StatelessWidget {
Widget build(BuildContext context) {
return Stack(
alignment: AlignmentDirectional.bottomStart,
// fit: StackFit.expand,
overflow: Overflow.visible,
children: [
Image.asset("assets/images/FSA_QR.png"),
Positioned(
left: 20,
bottom: -50,
child: Container(width: 150, height: 150, color: Colors.red),
),
Positioned(
right: 0,
child: Text(
"lqr",
style: TextStyle(fontSize: 30, color: Colors.white, backgroundColor: Colors.black),
),
)
],
);
}
}
# 三、综合案例
class StackDemo2 extends StatelessWidget {
Widget build(BuildContext context) {
return Stack(
children: [
Image.asset("assets/images/FSA_QR.png"),
Positioned(
left: 0,
right: 0,
bottom: 0,
child: Container(
padding: EdgeInsets.symmetric(horizontal: 8.0),
color: Color.fromARGB(160, 0, 0, 0),
child: Row(
mainAxisAlignment: MainAxisAlignment.spaceBetween,
children: [
Text(
"欢迎关注公众号: FSA全栈行为",
style: TextStyle(fontSize: 20, color: Colors.white),
),
IconButton(
icon: Icon(Icons.favorite),
color: Colors.red,
onPressed: () => print("点击了收藏"),
)
],
),
),
)
],
);
}
}


- 01
- Flutter - GetX Helper 如何应用于旧页面06-14
- 02
- Flutter - GetX Helper 助你规范应用 tag06-08
- 03
- Flutter - Xcode16 还原编译速度04-05
