 Flutter - 混编项目集成Shorebird热更新🐦(iOS篇)
# 一、概述
关于 Shorebird 的初始化内容可以在上一篇《Flutter - 混编项目集成Shorebird热更新🐦(安卓篇)》中查看,这里就不再赘述了。
Shorebird 官方文档上对于 iOS 混编方案集成热更新的介绍不算详细,只能说点明了要点,指明了方向。
本文将根据实际的项目应用情况做出集成调整,并补充说明正确的补丁验证方案。
# 二、踩坑
Shorebird 文档里指出需要我们使用类似 Flutter 官方文档里 Option B - Embed frameworks in Xcode 的方式去集成 Flutter 模块。
关于
Flutter官方文档指出的各种集成方式可以查看: https://docs.flutter.dev/add-to-app/ios/project-setup (opens new window)
具体的步骤就是:
- 先注释掉原来的
Option A集成方式的相关配置代码 - 执行
Shorebird Release去构建对应的所有xcframework文件。(xcframework文件包括了Flutter.xcframework和App.xcframework,以及插件依赖的原生第三方库对应的xcframework) - 将所有构建完成的
xcframework拖到Build Phases中的Embed Frameworks内。 - 将
xcframework的所在目录路径配置到Framework Search Paths。 - 配置
xcframework的Embed模式,静态库必须选Do Not Embed,动态库必须选Embed & Sign。
因为 Option A - Embed with CocoaPods and the Flutter SDK 的方式只需要简单的配置 Podfile 就可以集成 Flutter 模块,所以相信大家在一般情况下都是会选择 Option A 的方式。很明显,要改成 Option B 需要我们大改特改。
改成 Option B 这种方式有以下几点问题:
# 1、vendored_frameworks 缺失
如果你依赖的 Flutter 插件依赖了原生第三方的二进制包,如 realm,在它的 podspec 文件是这样声明的 s.vendored_frameworks = 'realm_dart.xcframework',那你会发现在最终构建完成的 xcframework 的目录里会缺少这些 vendored_frameworks。
相关的 issue: https://github.com/flutter/flutter/issues/125530 (opens new window)。
因为 Option B 是二进制依赖,所以在编译的时候并不会报任何错误,等你 App 运行起来进入一些相关场景,使用到了对应的第三方功能时就会直接来个找不到符号的错误,如:
Failed to lookup symbol 'native_method_signature': dlsym(0xa47e7c10, native_method_signature): symbol not found
接着就是闪退,可想而知这得多吓人!
# 2、重复编译
vendored_frameworks 缺失的问题我通过脚本解决了,但是还有另一个问题,这些 xcframework 中也有可能出现涵盖你原来的原生工程里依赖的第三方包,比如,Flutter 的插件用到了 FMDB,生成的 xcframework 中就会包含 FMDB.xcframework,而你的原生工程本来就有依赖 FMDB,这个时候编译,Xcode 就会告诉你重复了,编译不通过,报错内容如下:
Showing Recent Messages
Multiple commands produce '/Users/lxf/Library/Developer/Xcode/DerivedData/xxx.app/Frameworks/FMDB.framework'
如果是你,你选择留下哪个呢?
- 如果你选择了
Flutter帮你生成的FMDB.xcframework,你就得去处理其它原生第三方依赖的pod 'FMDB',假如此时原生工程里的一些第三方库或私有库也依赖FMDB,那你要处理这些库可就太麻烦了。 - 如果你选择使用
pod 'FMDB'的方式,那你只需要去判断原生工程里是否有对应的依赖,有的话就不再声明依赖,这种还好。
# 3、静态库与动态库
生成的 xcframework 中,有些是静态库,有些是动态库
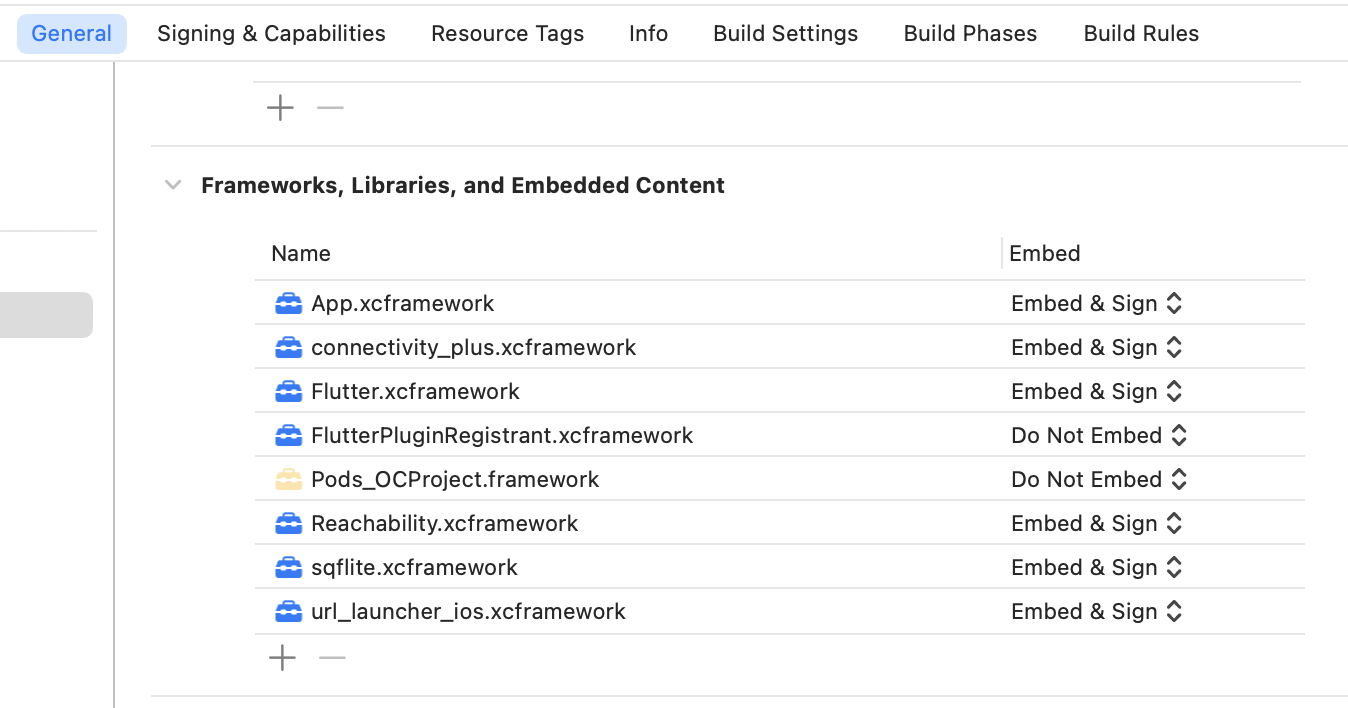
如图所示,静态库必须选 Do Not Embed,动态库必须选 Embed & Sign。
如果你全选了 Embed & Sign,那么你就无法启动 App 了,如下图所示
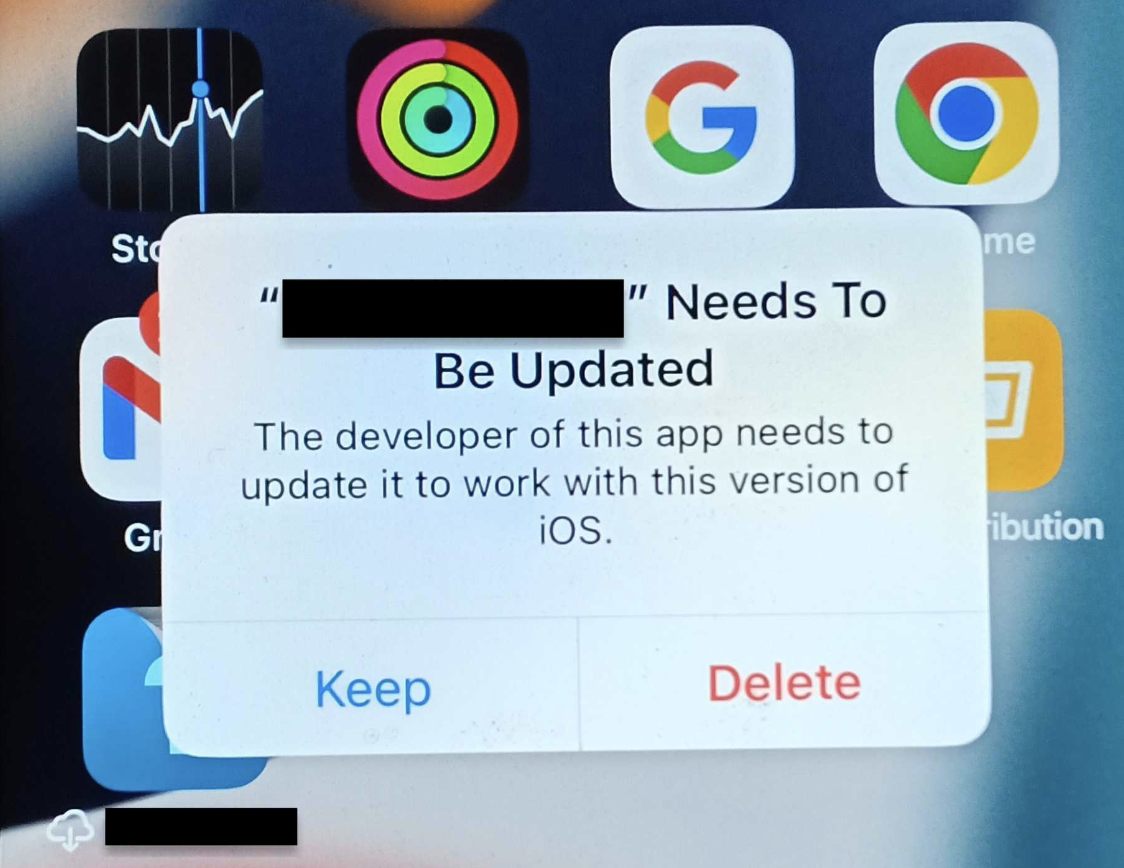
该问题的相关 issue: https://github.com/flutter/flutter/issues/122183
所以为了避免这种情况,我们就必须得选对 Embed 选项,可以使用 file 命令去判断 xcframework 是静态库还是动态库
file FlutterPluginRegistrant.xcframework/ios-arm64/FlutterPluginRegistrant.framework/FlutterPluginRegistrant
FlutterPluginRegistrant.xcframework/ios-arm64/FlutterPluginRegistrant.framework/FlutterPluginRegistrant:
current ar archive random library // 静态库

file url_launcher_ios.xcframework/ios-arm64/url_launcher_ios.framework/url_launcher_ios
url_launcher_ios.xcframework/ios-arm64/url_launcher_ios.framework/url_launcher_ios:
Mach-O 64-bit dynamically linked shared library arm64 // 动态库
这部分判断逻辑只能交给脚本处理了,因为当数量起来后你就会体验到什么叫崩溃,别问我是怎么知道的 😭
# 4、直接崩溃
后面我直接用脚本判断 Flutter 插件依赖了哪些原生第三方,将它们统一在原生工程内声明依赖,在一些情况下这也是很危险的,如 connectivity_plus 这个 Flutter 插件依赖了 ReachabilitySwift,你必须得使用 Reachability.xcframework 二进制嵌入的方式,否则运行就崩~
dyld[31764]: Symbol not found: _$s12ReachabilityAAC10ConnectionO4wifiyA2DmFWC
  Referenced from: <8142F86E-4C9C-3513-AD29-D3522FC6677F> /Users/lxf/Library/Developer/Xcode/DerivedData/xxx/connectivity_plus.framework/connectivity_plus
  Expected in:     <DA318000-9A97-35AD-87EA-7C5B635DE010> /Users/lxf/Library/Developer/xxx.app/Frameworks/Reachability.framework/Reachability
# 三、分析
后来仔细想想,Shorebird 的热更新是针对 Dart 代码,跟原生无关,能不能按原来的 Cocoapods 方式去集成 Flutter.xcframework,App.xcframework 以及插件依赖的原生第三方库呢?
答案是可以的,来看看 install_all_flutter_pods 方法
def install_all_flutter_pods(flutter_application_path = nil)
  ...
  flutter_application_path ||= File.join('..', '..')
  # 生成 .ios/Flutter/Flutter.podspec
  install_flutter_engine_pod(flutter_application_path)
  # 集成 插件依赖的原生库 Pods
  install_flutter_plugin_pods(flutter_application_path)
  # 编译并集成 Flutter.xcframework 和 App.xcframework
  install_flutter_application_pod(flutter_application_path)
end
# 1、install_flutter_engine_pod
install_flutter_engine_pod 生成的 Flutter.podspec 是假的podspec,里面没啥实质内容,仅代表 Flutter.xcframework,为什么要这么做呢?因为一些 Flutter 插件声明需要依赖 Flutter,如:
Pod::Spec.new do |s|
  s.name             = 'sqflite'
  ...
  s.dependency 'Flutter'
  s.dependency 'FMDB', '>= 2.7.5'
  ...
end
如果没有这个 Flutter.podspec,那么执行 pod install 就会从 CocoaPods trunk 下载 Flutter 了。
# 2、install_flutter_application_pod
install_flutter_application_pod 会去编译 Flutter.xcframework 和 App.xcframework,并将它们并集到我们的原生工程内。不过这两玩意我们用 Shorebird Release 去生成了,所以这个方法我们用不上。
我们可以结合上述的 Flutter.podspec 的作用,修改它内部的依赖声明,从而实现通过 Cocoapods 的方式来集成 Flutter.xcframework 和 App.xcframework。
Pod::Spec.new do |s|
s.name             = 'Flutter'
s.version          = '1.0.0'
s.summary          = 'A UI toolkit for beautiful and fast apps.'
s.homepage         = 'https://flutter.dev'
s.license          = { :type => 'BSD' }
s.author           = { 'Flutter Dev Team' => 'flutter-dev@googlegroups.com' }
s.source           = { :git => 'https://github.com/flutter/engine', :tag => s.version.to_s }
s.ios.deployment_target = '11.0'
# Framework linking is handled by Flutter tooling, not CocoaPods.
# Add a placeholder to satisfy `s.dependency 'Flutter'` plugin podspecs.
#
# 以上到这句都是原来的,将这句注释掉
+ # s.vendored_frameworks = 'path/to/nothing'
# 新增下面这句,声明依赖当前目录下的 Flutter.xcframework 和 App.xcframework
+ s.vendored_frameworks = 'Flutter.xcframework', 'App.xcframework'
end
生成的所有 xcframework 所在路径为: xxx/flutter_module/build/ios/framework/Release, 我们自己创建的 Flutter.podspec 中的依赖是相对路径,所以该 podspec 也是跟 xcframework 放到一起,当然也可以根据你自己的习惯进行调整。
# 3、install_flutter_plugin_pods
install_flutter_plugin_pods 会将 Flutter 插件依赖的原生库集成到我们的原生工程,这正是我们需要的。
不过如果你直接将 Podfile 中的 install_flutter_application_pod 给替换成 install_flutter_plugin_pods ,执行 pod install 时是会报如下错误的:
pod install

[!] Invalid `Podfile` file: undefined method `flutter_relative_path_from_podfile' for #<Pod::Podfile:0x000000010e74c520 @defined_in_file=#<Pathname:/Users/lxf/xxx/Podfile>, @internal_hash={}, @root_target_definitions=[#<Pod::Podfile::TargetDefinition label=Pods>], @current_target_definition=#<Pod::Podfile::TargetDefinition label=Pods>>

  relative = flutter_relative_path_from_podfile(export_script_directory)
也就是找不到 flutter_relative_path_from_podfile 方法,因为该方法在并不在你的 Flutter 模块的 podhelper.rb 中,而是在 packages/flutter_tools/bin/podhelper.rb。
至于为什么原来的 install_all_flutter_pods 方法不会报错,是因为在该方法内先引用了 flutter_tools/bin/podhelper.rb。
关键代码如下:
def install_all_flutter_pods(flutter_application_path = nil)
  ...
  # 就是这句
  require File.expand_path(File.join('packages', 'flutter_tools', 'bin', 'podhelper'), flutter_root)

  flutter_application_path ||= File.join('..', '..')
  install_flutter_engine_pod(flutter_application_path)
  install_flutter_plugin_pods(flutter_application_path)
  install_flutter_application_pod(flutter_application_path)
end
所以我们可以如法炮制,在 install_flutter_plugin_pods 方法中加入 require 这一行代码,以解决上述错误。
def install_flutter_plugin_pods(flutter_application_path)
+  require File.expand_path(File.join('packages', 'flutter_tools', 'bin', 'podhelper'), flutter_root)
  flutter_application_path ||= File.join('..', '..')
  ...
end
老是这么改也不是个办法,所以我提了个 PR: https://github.com/flutter/flutter/pull/141521
该
PR现已合并,应该会在3.16.9及之后的版本中生效。
经过验证,该方案是可行的,下面我们来看看如何调整原生工程和 Shorebird 在 iOS 混编下如何使用吧。
# 四、原生工程调整
在 Podfile 文件中,将 Flutter 壳工程的源码依赖方式调整为二进制依赖
- install_all_flutter_pods(flutter_application_path)
+ # 源码集成
+ # install_all_flutter_pods(flutter_application_path)

+ # 二进制集成
+ pod 'Flutter', path: 'xxx/flutter_modules/build/ios/framework/Release'
+ install_flutter_plugin_pods(flutter_application_path)
- 声明
Flutter依赖,用于集成Flutter.xcframework和App.xcframework。 Option A方式所需要的代码统统保留,只需要将install_all_flutter_pods替换为install_flutter_plugin_pods,用于集成Flutter插件所依赖的原生第三方库
# 五、创建 Shorebird Release
打发布包的时候操作,在 Flutter 工程目录下执行
cd xx/xx/flutter_modules

# 7.0.0+2: 版本号+build版本号
shorebird release ios-framework-alpha --release-version 7.0.0+2
该命令内部会去执行
flutter build ios-framework --no-debug --no-profile ...,并且使用的是Shorebird魔改的Flutter引擎!
版本号可以在如下图所示进行查看
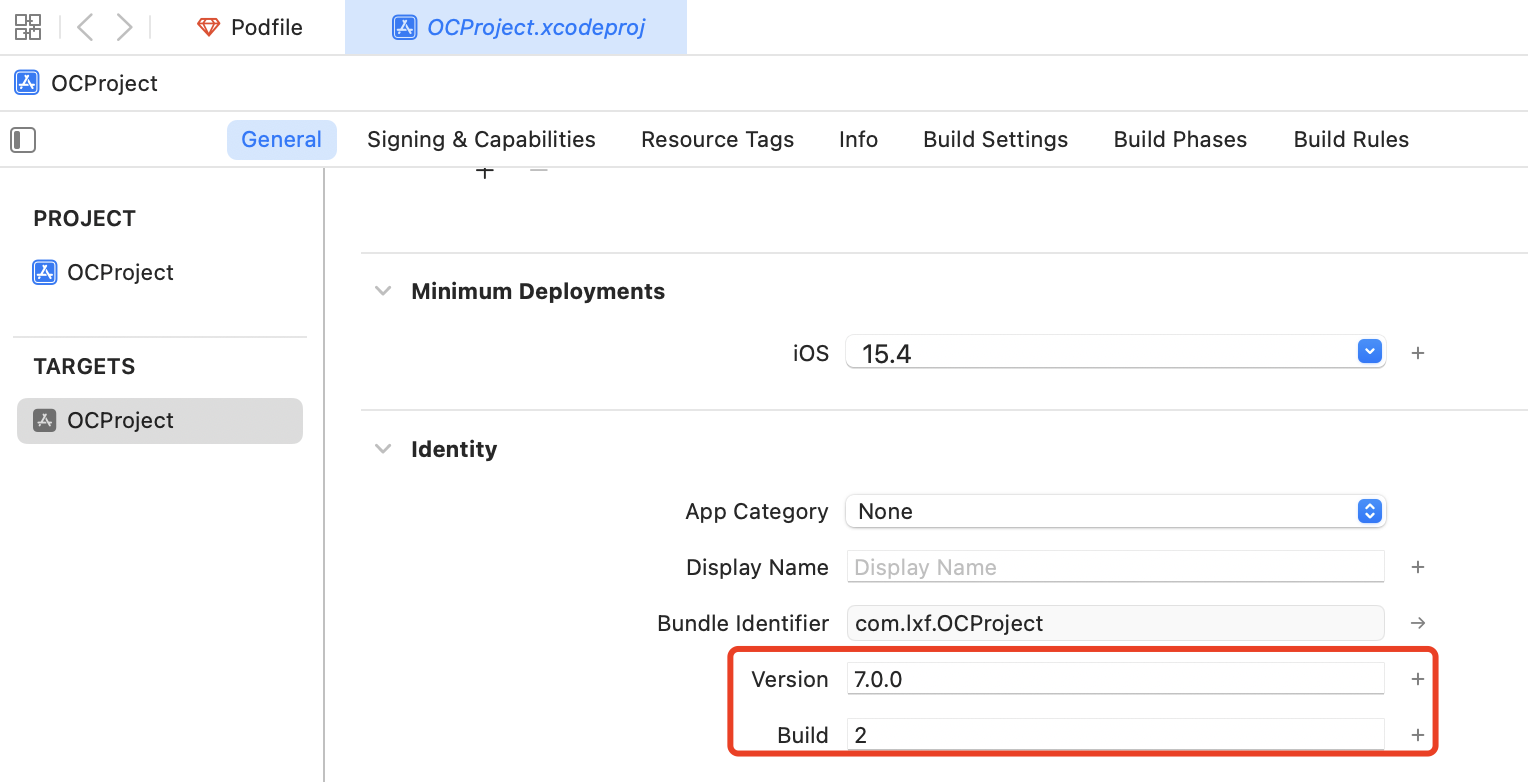
ShoreBird 的内部逻辑会去以这个版本号组合,向服务器请求判断是否存在相应版本的相关补丁!
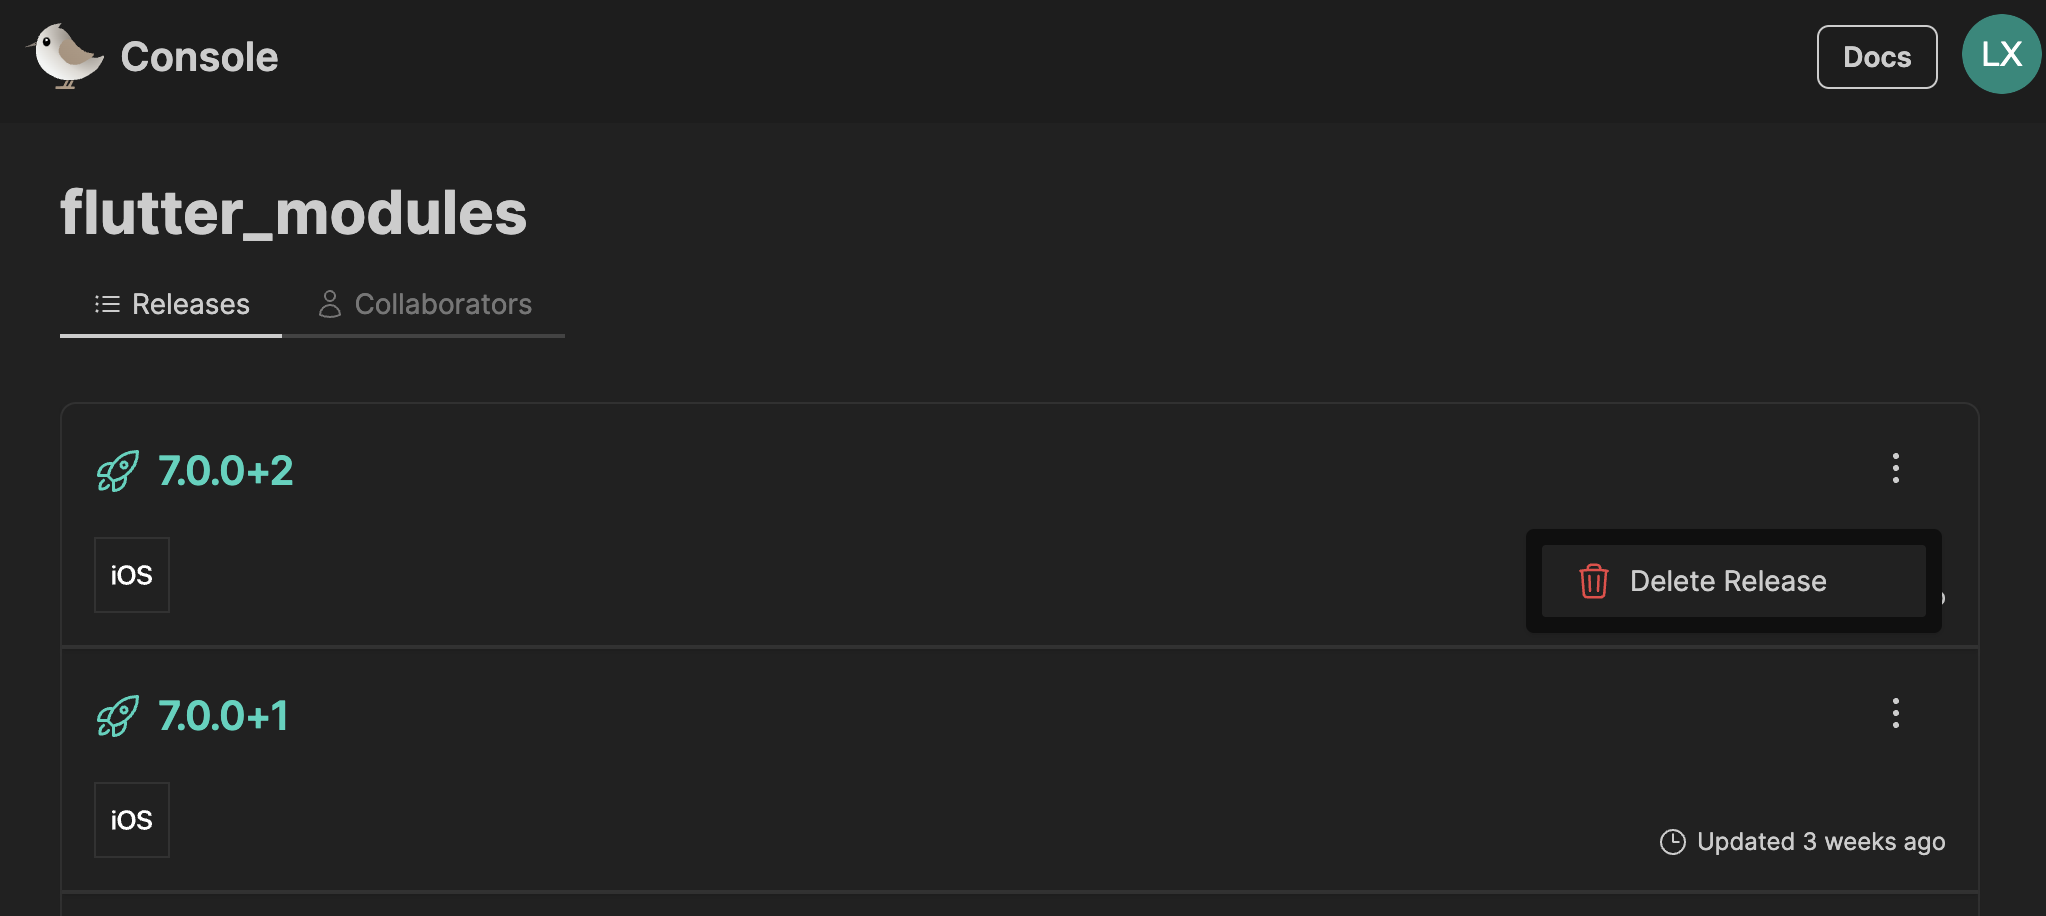
执行完成后,在 Shorebird 控制台上可以看到相应的项
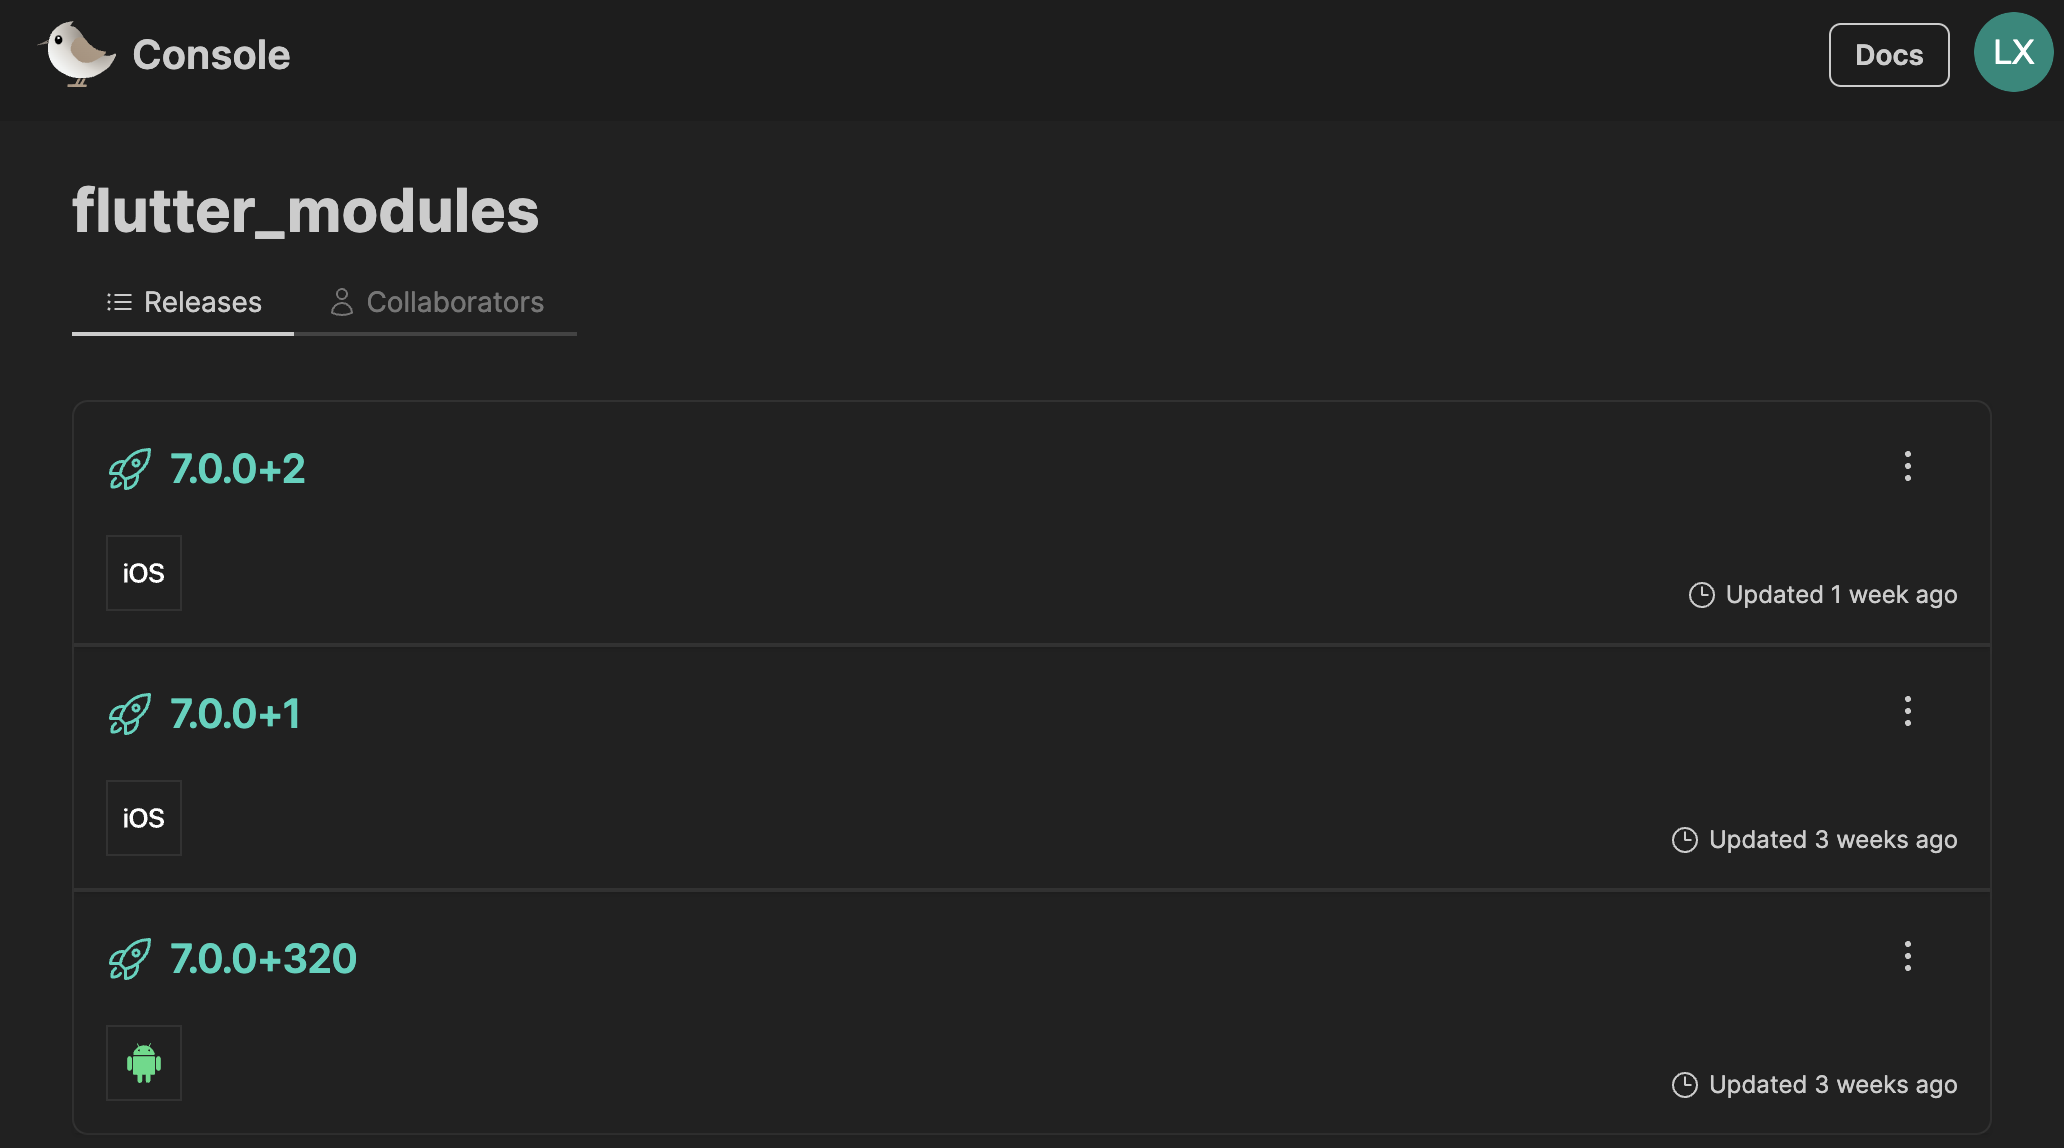
在命令执行前,请确保不存在 7.0.0+2 的 Release,如果有的话,请先删除
# 六、创建 Shorebird Patch
紧急修复线上包的bug时操作,在 Flutter 工程目录下执行
shorebird patch ios-framework-alpha --release-version 7.0.0+2
注:版本号与上述的 release 命令中使用的要保持一致!
执行完成后,在 Shorebird 控制台上点击对应的 Release 项,进去后可以看到相应的补丁
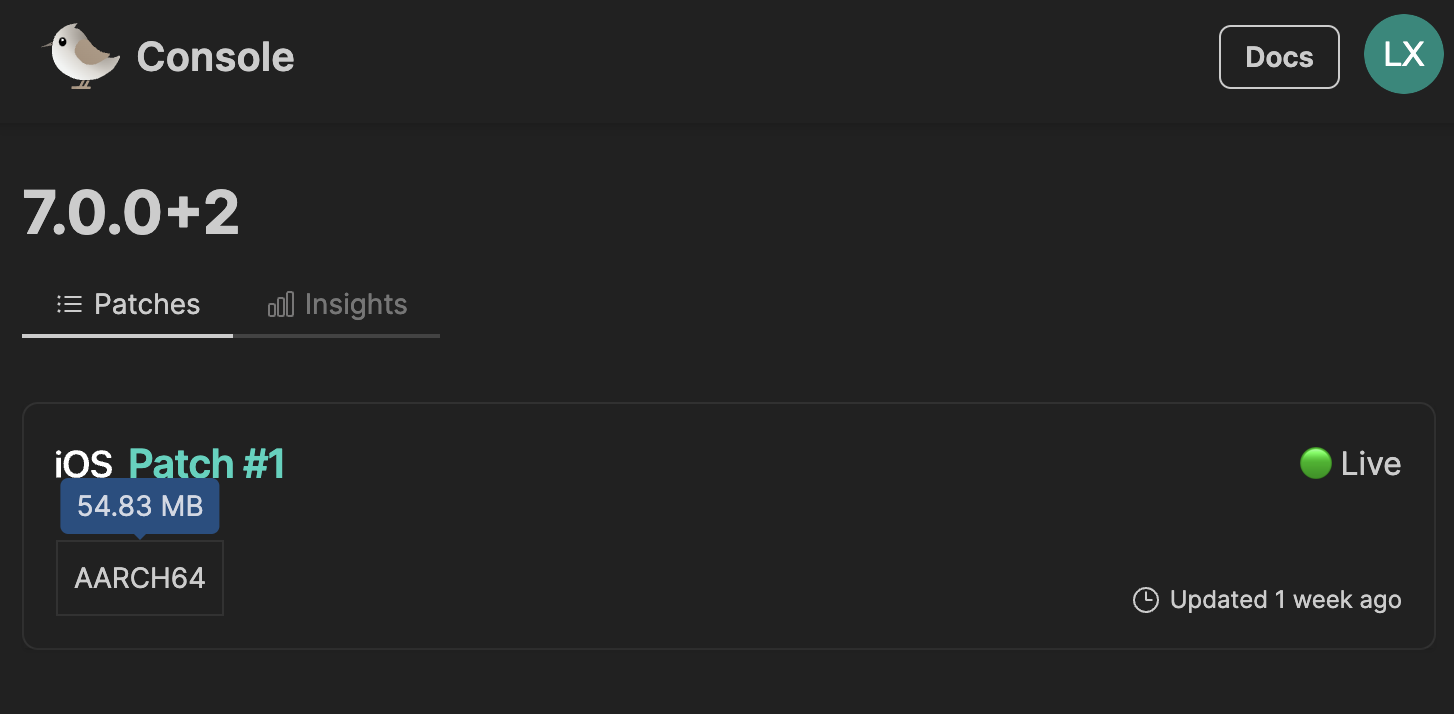
看看这个补丁大小,我们再来看看安卓的补丁大小
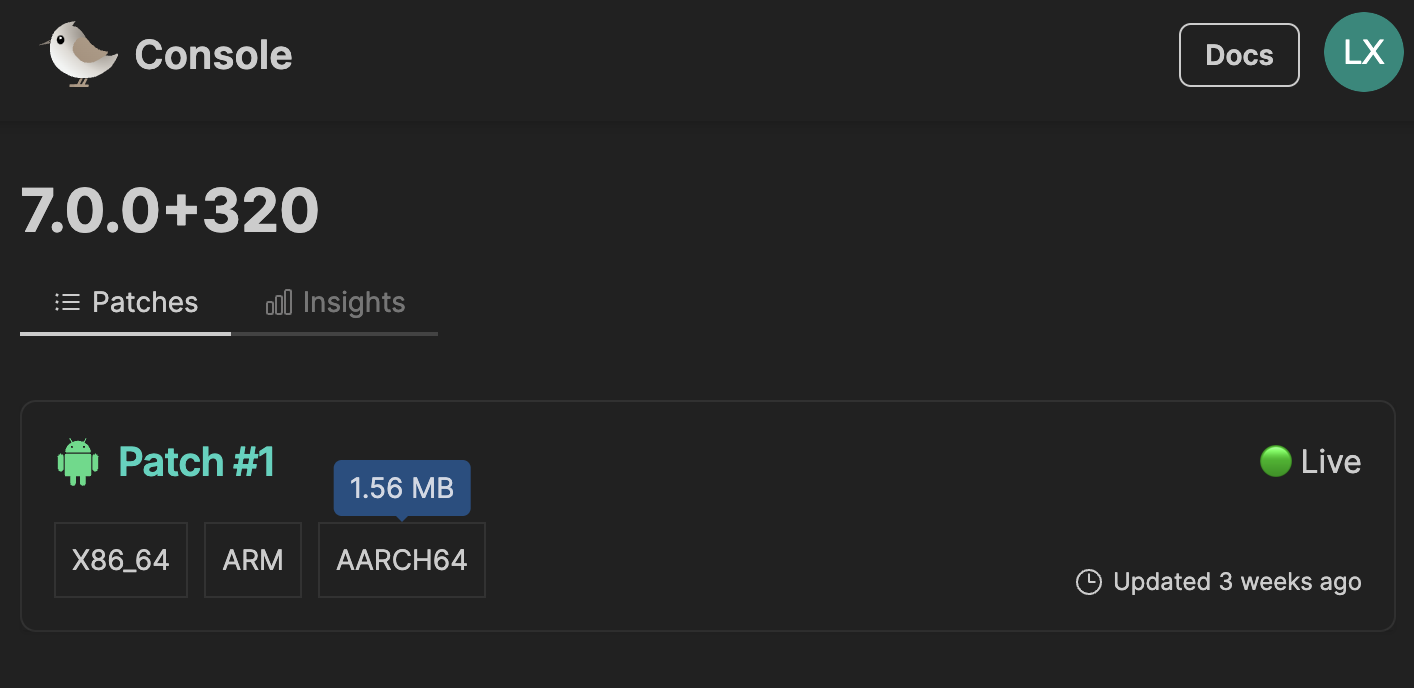
一样的修改,安卓的补丁大小不到
2 MB,iOS的补丁大小高达54.83 MB😂
# 七、热更新验证
官方文档上就只是说重启
App查看补丁是否生效,并没有说明失败了该如果排查问题~
1、在执行完 shorebird release 命令并完成上述原生工程的调整后,将原生工程的编译模式调整为 Release 进行编译。
此时会依赖的 flutter_modules/build/ios/framework/Release 下的 xcframework,备份为 Release_release
2、关闭 App,打 patch,注意,此时 flutter_modules/build/ios/framework/Release 下的内容会被清空并重新创建。
3、打 patch 后,将 Release_release 改回 Release 用 Xcode 重新运行 App,一切正常的话即可看到变化。
无论成功还是失败,Xcode 的控制台都会有相应的输出
成功
2024-01-03 18:37:55.838328+0800 xxx[623:70498] [VERBOSE0:shorebird.cc(151)] Shorebird updater: no active patch.
2024-01-03 18:37:55.838424+0800 xxx[623:70498] [VERBOSE0:shorebird.cc(155)] Starting Shorebird update
[00:00:00.002] (1701cb000) INFO   Sending patch check request: PatchCheckRequest { app_id: "xxxxxxxx-xxxx-xxxx-xxxx-xxxxxxxxxxxx", channel: "stable", release_version: "7.0.0+2", patch_number: None, platform: "ios", arch: "aarch64" }

[00:00:30.871] (1701cb000) INFO  Patch 1 successfully installed.
[00:00:30.871] (1701cb000) INFO   Update result: Update installed
失败
可以搜索关键字
PatchCheckRequest定位
2024-01-03 18:37:55.838328+0800 xxx[623:70498] [VERBOSE0:shorebird.cc(151)] Shorebird updater: no active patch.
2024-01-03 18:37:55.838424+0800 xxx[623:70498] [VERBOSE0:shorebird.cc(155)] Starting Shorebird update
[00:00:00.002] (1701cb000) INFO   Sending patch check request: PatchCheckRequest { app_id: "xxxxxxxx-xxxx-xxxx-xxxx-xxxxxxxxxxxx", channel: "stable", release_version: "7.0.0+2", patch_number: None, platform: "ios", arch: "aarch64" }

[00:00:30.871] (1701cb000) ERROR  Update failed: error decoding response body: operation timed out
Caused by:
    operation timed out

[00:00:30.871] (1701cb000) INFO   Update thread finished with status: Update had error
该失败是因为国行机特有的网络权限导致的,开启 Shorebird 的自动检查更新的话,会在网络权限被赋予前去请求,结果就是失败,所以需要关闭自动检查更新,使用 shorebird_code_push (opens new window) 去延迟检查。
# 八、脚本
由于我们日常研发还是使用的是源码依赖的方式,只会在打最终测试包时才需要去做上述的调整操作,所以这里用我比较熟悉的 Python 去制作了简易的脚本,并结合 Jenkins 来辅助完成这种万年不变的无聊步骤
脚本已上传至 Github: https://github.com/LinXunFeng/script_box/tree/main/flutter (opens new window)
看官可自取修改~
# switch_flutter_integrate.py
切换
Flutter项目的集成方式
# 二进制依赖
python switch_flutter_integrate.py -p '原生工程路径' -m 'binary' -f 'ios'

# 源码依赖
python switch_flutter_integrate.py -p '原生工程路径' -m 'source' -f 'ios'
# shorebird.py
自动获取版本号,并执行
Shorebird相关命令
# release
python shorebird.py -p '原生工程路径' -s 'Flutter工程路径' -m release -f ios

# patch
python shorebird.py -p '原生工程路径' -s 'Flutter工程路径' -m patch -f ios
需要注意的是,xcodeproj 和 target 的名字被我固定写成 OCProject,如下代码中高亮的那两行,大家请先将其修改为自己的工程名再使用 shorebird.py。
def handle_ios():
    """
    处理iOS项目
    """
    # 1. 读取主版本号
    # 请将 OCProject 修改为你们自己的工程名
+    xcodeproj_path = os.path.join(project_path, 'OCProject.xcodeproj')
    version = ReleaseVersionTool.fetch_project_version(
        xcodeproj_path=xcodeproj_path,
+        target_name='OCProject',
    )
由于我比较懒,就不改成通用的了 😏
# 九、最后
虽然 iOS 的热更新能用,但也仅仅只是能用,应用于很简单的应用程序,运行起来没有太明显的卡顿感知,但是稍微大点就可以感知到了,卡到怀疑人生那种,相比安卓端的没有任何性能损耗,iOS端的还需要再等等,毕竟现在 iOS 还是 Alpha 版本,相信不久将来 Shorebird 团队会解决该问题。
具体关于安卓和 iOS 两端之间的实现区别可以在这个 issue 中查看 https://github.com/shorebirdtech/shorebird/issues/871 (opens new window)
本篇到此结束,感谢大家的支持,我们下次再见! 👋

- 01
- Flutter - GetX Helper 如何应用于旧页面06-14
- 02
- Flutter - GetX Helper 助你规范应用 tag06-08
- 03
- Flutter - Xcode16 还原编译速度04-05
